Friday, May 30, 2008

Glossary of Knitting Terms and Abbreviations

I grew up knitting in Germany. So when I started knitting again in the US many years later, I had a hard time with English knitting instructions. Even the simplest things like "yo" threw me. Over time, I learned and learned and struggled and learned some more. One of the most helpful sites I found was the Knitting Glossary on knittinghelp.com. They even have little video clips of many stitches for both Continental and English knitting style!


But, to be sure I thought I would start my own glossary, so I would always have a place to go to and look things up. And here it is:


Note: this is a compilation (borrowed, stolen, copied) from a variety of different sources, too numerous to list. Please let me know what's missing...

“ or in(s) inch(es)

( ) repeat instructions inside the parentheses

* repeat instructions following the single asterisk

* * repeat instructions between asterisks

alt alternate

approx approximately

bar increase one stitch by knitting into the front and back of same stitch

bc back cable

beg begin(ning)

bet or btw between

blo back loop only

bo bind off, cast off

bor bind off row

bpdc back post double crochet

bt back twist

cA color A

cB color B

cc contrasting color

cdd centered double decrease. sl2 tog, k1, pass the slipped stitches over (tog)

ch chain (stitch) (using crochet hook). Create a slip knot, insert the crochet hook into the loop of the slip knot. Holding both the tail and the live end of the yarn in your left hand, wrap the live end around the hook and pull this loop through the slip knot loop. Repeat until desired number of chain stitches are created.
cir(c) circular

cm centimeter

cn cable needle: a short needle to help twisting a cable

co cast on

cont continue

cor carriage on right

cross 2 L cross 2 stitches to the left (to work a cable). Slip 2 stitches p-wise onto a cable needle, let cable needle hang in front of work as you knit the next couple of stitches; then knit stitches off of cable needle.

cross 2 R cross 2 stitches to the right (to work a cable). Slip 2 stitches p-wise onto a cable needle, let cable needle hang in back of work as you knit the next couple of stitches; then knit stitches off of cable needle

ctr center

dc double crochet: Yarn over hook, insert hook in the next stitch to be worked, yo hook, draw through stitch, yo hook, draw through first 2 loops on hook, yo hook, draw through rem 2 loops on hook.

dec decrease

dk double knitting weight yarn. Slightly finer than worsted weight. 22 stitches (22 sts) = 1"/2.5 cm

dpn or dp double pointed needle(s). Short needle with points at both ends, used in sets or 4 or 5, for knitting in the round (mostly for socks)

dtr double treble crochet (aka quad crochet): Yarn over hook twice. Insert hook in the next stitch to be worked. Yo hook. Pull yarn through stitch—3 loops on hook. Yo hook. Pull yarn through first 2 loops on hook. Yo hook. Repeat last step until 2 loops remain on hook. Pull yarn through remaining 2 loops on hook

eon end of needle

eor end of row

est established

fc front cross (in working a cable), or front cable

fl front loop(s)

flo front loop only

FO finish off

fol(l) follow; follows; following

fpdc front post double crochet

ft front twist

g or gr gram

g st garter stitch = knit every row

grp group

hdc half double crochet: Yarn over hook. Insert hook in the next stitch to be worked. YO hook. Pull yarn through stitch. YO hook. Pull yarn through all 3 loops on hook (one half double crochet made)

hk hook

in(s) or “ inch (es)

inc increase = work twice in the same stitch

incL increase left = knit into the back of the left side of the stitch of 2 rows below stitch on the right needle

incR increase right = knit into the back of the right side of the stitch of the row below stitch on left needle

incl including

ins insert

k knit, knit stitch

k tbl or k1 tbl or k1 blp or k1b knit stitch through the back loop

k-b knit stitch in row below. (Infrequently used for knit through the back loop; see K tbl)

k-wise knit-wise. Insert right needle into the stitch as if to knit it

k1 f&b or kfb or kf&b knit 1 stitch in the front, then in the back. This is also called a Bar Increase (= inc)

k1togww knit 1 together with wrap: Slip the wrap onto the left needle tip and knit together with the stitch through the back loop.

k2t or k2tog knit 2 stitches together

k2tog tbl knit 2 stitches together, through the back loops

k3t or k3tog knit 3 stitches together

kll knit left loop (= inc)

krl knit right loop (= inc)

ktbl or k1 tbl or k1 blp or k1b knit through back loop

kw knit-wise, as if to knit

k.co knit cast on

lc left cross (to work a cable). As in: cross 2 L

lh left hand

lhn left hand needle

lp(s) loop(s)

lsi left slanting increase = insert left-hand needle under bar from front, btw last stitch worked and 1st stitch on right-hand needle, knit (or purl) strand through back of loop.

lt left twist (two stitches cross each other = smallest cable stitch possible)

m meter

m1 make 1 (= inc). If the method isn't specified, use whichever increase you like, for instance m1f. Insert lhn front to back under horizontal strand between the st on the lhn and the st just worked, forming a loop on the needle, knit this loop through the back.

m1A make 1 away (= inc)

m1L or m1 or m1f make 1 (front)(left) (= inc). From the front, lift loop between stitches with left needle, knit into back of loop

m1p make one purl-wise

m1R or m1b make 1 (back) (right) (= inc). From the back, lift loop between stitches with left needle, knit into front of loop

m1T make 1 towards (= inc)

mb make bobble

mc main color

meas measures

mm millimeter

my main yarn

ndl(s) needle(s)

no number

nr next row

oz ounce(s)

p purl

p tbl or p1 tbl or p1b purl through the back loop

p-b purl stitch in the row below. (sometimes used to mean purl stitch in the back loop; see p tbl)

p-wise purl wise: Insert right needle down into the front loop, or up into the back loop for tbl

p1 f&b or pfb purl the front of a stitch, then purl the back of the same stitch

p2sso pass 2 slipped stitches over

p2tog or p2t purl 2 together

p2tog tbl or p2togtbl purl 2 together through the back loops (Alternately, purl 1 st, place it back on the lhn. With point of right-hand needle (rhn), pass the next st over it and slip the st back to the rhn)

p3tog purl 3 together

pat(s) or patt(s) pattern(s)

pm place marker

pnso pass next stitch over

pop popcorn stitch

prev previous (ly)

psso pass slipped stitch over (as in slip 1, knit 1, psso)

pu or p/u pick up stitches

pu&k pick up and knit

pw purl-wise, as if to purl

Rc right cross (to work a cable), as in: cross 2 R

rc row counter

rd or rnd round, as in one entire round. In circular knitting, a “row” is called a “round”

rem remaining or remove

rep or rpt repeat

rev revers(e)(ing)

rev St st Reverse stockinette/stocking stitch. The “purl” side of plain, stockinette stitch. Purled on RS, knitted on WS

rh right hand

rhn right hand needle

rib ribbing: vertical columns of knit and purl stitches, side by side, as in K1, P1 ribbing

rnd or rd round, as in one entire round. In circular knitting, a "row" is called a "round."

rpt or rep repeat

rs right side, for instance the outside of a sweater. Stated to indicate which side is facing you when carrying out instructions

rsr right side row

rsi right slanting increase = insert lhn under bar from back, bet last st worked and 1st st on rhn, knit (or purl) strand through front of loop

rt right twist: knit the second st through the back loop, then knit the 1st (2nd st crosses over the first st, to the right) (two stitches cross each other = smallest cable stitch possible)

rt2 right twist 2

s or sl slip the next st purl-wise

sb Slip bead over next stitch

sc single crochet: Insert hook in stitch. Yarn over hook. Pull yarn through stitch. YO hook. Pull yarn through 2 loops on hook (one single crochet made)

sk skip or skein

sk st skip stitch: Move past the next stitch without working it

s2kp slip 2 sts together as if to knit, knit the next st, then pass both slipped sts over this st

sk2p slip1, knit 2 tog, pass slipped stitch over (a double decrease)

skp or skpo "Slip, Knit, Pass." Slip a stitch, knit the next stitch, pass the slipped stitch over the knit one. The same as: sl1, k1, psso

sl or s slip a stitch. If they don't specify, slip the stitch purl-wise. Unless you are decreasing: then, slip it knit-wise on the knit rows, and purl-wise on the purl rows

sl st slip stitch: Slip crochet hook into stitch, YO, draw loop through stitch and through loop on hook

sl1, k1, psso slip1 knit-wise, knit1, pass the slipped stitch over. The same as skp

sl1k or sl 1 k-wise slip a stitch knit-wise (yarn at back)

sl1 k2togpsso slip 1 st knit-wise, k 2 tog and pass slip st over the k2tog

sl1p or sl 1 p-wise slip a stitch purl-wise

sl1 wyif slip 1 st purl-wise with yarn in front

slip knot an adjustable loop, used to begin many cast-on methods

sm slip marker

sp space or single-pointed

spi stitches per inch

ss slip stitch (Canadian)

ss or St st or st st stocking or stockinette stitch: Knit 1 row, purl 1 row

ssk slip, slip, knit slipped stitches tog (= dec)

ssk (improved) sl 1, sl 1 p-wise, knit slipped sts tog

ssp slip, slip, purl, usually done on the purl-side (= dec)

sssk slip, slip, slip, knit 3 slipped stitches together. A double decrease

st(s) stitch(es)

St st or ss or st st stocking or stockinette stitch: Knit 1 row, purl 1 row

syif slip st purl-wise with yarn in front

t turn

tbl through back loop

tog together

tr treble crochet: Yarn over twice, insert hook in the next stitch to be worked, YO, draw yarn through stitch—3 loops on hook, YO, draw through first 2 loops on hook, YO, draw through first 2 loops on hook, YO, draw through rem 2 loops on hook.

Tsc Tunisian single crochet

vdd vertical double decrease: slip 2 sts as if to work k2tog, k 1, pass slipped stitches over (2 stitches decreased)

wo or won wool (or yarn) over needle

wpi wraps per inch

wrn wool round needle

ws wrong side, for instance the inside of the sweater. Stated to indicate which side is facing you when carrying out instructions

wsr wrong side row

ww worsted weight yarn

wy waste yarn

wyib or wyb with yarn in back

wyif or wyf with yarn in front

x times

yb or ybk yarn to the back. Move yarn to the back of the work by going between the needle tips

yd(s) yard(s)

yfon yarn forward and over needle. Same as yo

yfrn yarn forward and 'round needle. Same as yo

yfwd or yf yarn forward

yo yarn over: wrap the yarn around right needle

yo2 or yo twice yarn over twice

yon yarn over needle from back to front. Same as yo

yrn or yron yarn round needle: Bring yarn around needle from front to back.

ytb yarn to back of work

specific to crochet

Tuesday, May 27, 2008

What's this obsession with feet and socks??? And what is a "fong"????

It's a "foot thong!"

I saw this really cool pattern for "The Fong!" on the "Island of Misfit Patterns" and wanted to make one:


Picture "borrowed" from the above source.


I had a tiny bit of Knit Picks, Felici, Coastal, left over from the below socks and cast on.


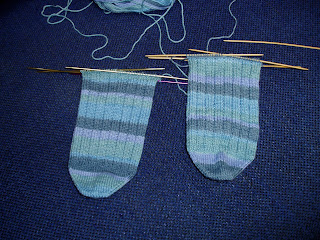
Well, the yarn didn't last long, so I put "The Fong!" project on hold, got out two more skeins of coastal and cast on another pair of socks. Just my standard toe-up, seed-stitch rib, run-of-the-mill socks.


But I made sure to bind off early enough to have enough yarn left over to finish "The Fong!" So here is another pair of (short) "Coastal" socks.


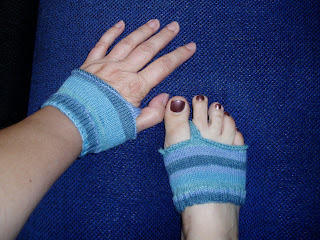
Okay, back to "The Fong!" I finished a pair, but am not sure, if it should go on the foot...


... or the hand. They can totally be used as little fingerless glove thingies as well. I can't wait to see if my daughter will prefer them on her hands or feet :).

I might make some more later, but I think they need a few alterations. First of all, I would but a little ribbing on both sides, to keep the stockinette from rolling up. Then I think the little between-the-toes part could be a bit wider, especially if you want to wear your fong with flip-flops. It's a cute idea though!

So while I was into kind of funky foot-wear (and I still had some of the yarn left), I also started a pair of "toe warmers."


Foto from Ravelry

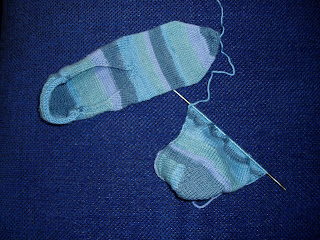
And, of course, you guessed it... I ran out of yarn again. I finished one toe warmer, though I prefer the name "sockette," and started the second one, but didn't quite have enough. And Knit Picks doesn't make or sell the "Coastal" any more, so...

... I can either open up one of the fongs or finish the second sockette with a different yarn. Or leave it forever unfinished. Hey, it's happened before...

Monday, May 26, 2008

Sweaty (stinky) feet anyone???

I started another pair of toe-up socks a little while ago. Sort of as a stand-by, when I don't want to work on anything else. You know, the usual, Knit Picks, Felici, color: "Atmosphere," toe-up... I know I can do these socks, so when I need a successful knitting experience, I grab them.


But then I wanted to finish the socks, because I wanted to make them short so I would have enough yarn left-over for either these toe-warmers or footlets


or these ballet school dropout sockettes.


Note: these are the pictures that come with the patterns, not mine yet.

Aren't they both way cool?! My daughter has this really bad habit of wearing her shoes without socks (it's the in-thing these days). Since sweaty feet kind of run in our family, we just do better (and our shoes do better), when we wear socks. So I thought these would be great.

Anyway, so I rushed to finish the short socks and here they are:


I knit the instep part with my standard seed-stitch rib pattern. After the heel was done, I did the seed-stitch rib all around for maybe half an inch or so, then another half inch of plain knit, so the end would roll over. I like that. This time I used the purl cast-off somebody had recommended, and it really is pretty stretchy. My best one yet so far. Thanks!

Then, finally, I got to start the "sockettes." I got to the third line of the knitting instructions and already got stumped. I had to look up "kfb." The Knitting Glossary quickly came to the rescue. I love that site!

I made a few slight alterations as I went along and here is how I made the "sockettes" with Knit Picks Felici:

Cuff:
Cast 27 sts on dpns.
Rows 1-4: sl1, k to the last st, sl1 (this is supposed to create a little extra cuff that will fold over the shows to avoid blisters)

Heel:
Row 1: sl1, k2, *kfb, k3*, repeat from * to the last 3 sts, k2, sl1 (there are now 33 sts)
Row 2: sl1, k to the last st, sl1
Row 3: sl1, *sl1, k1*, repeat from * to the last st, sl1
Row 4: sl1, p to the last st, sl1
Repeat rows 3 and 4 18 times
Next row: sl1, *sl1, k1*, repeat from * to the last st, sl1

Shape heel:
Row 1: sl1, p16, p2tog, p1, turn
Row 2: k3, sl1, k1, psso, k1, turn
Row 3: p4, p2tog, p1, turn
Row 4: k5, sl1, k1, psso, k1, turn
Row 5: p6, p2tog, p1, turn
Row 6: k7, sl1, k1, psso, k1, turn
Row 7: p8, p2tog, p1, turn
Row 8: k9, sl1, k1, psso, k1, turn
Row 9: p10, p2tog, p1, turn
Row 10: k11, sl1, k1, psso, k1, turn
Row 11: p12, p2tog, p1, turn
Row 12: k13, sl1, k1, psso, k1, turn
Row 13: p14, p2tog, p1, turn
Row 14: k15, sl1, k1, psso, k1, turn
Row 15: p16, p2tog, turn
Row 16: k16, sl1, psso


Foot:
Get a 3rd dpn
Pick up 19 sts along the side of the heel
Turn around and work your way back across
Pick up 19 sts along the other side of the heel (total 55 sts)

Knit the next two rows until only 38 sts remain:
Row 1: sl1, k2, p to the last 3 sts, k2, sl1
Row 2: sl1, k2, k2tog, k to the last 5 sts, sl1, k1, psso, k2, sl1

Knit the next two rows until the sockette is 11cm/4.5 inches less than foot length, ending with row 1:
Row 1: sl1, k2, p to the last 3 sts, k2, sl1
Row 2: sl1, k to the last st, sl1


(Hint: After a while you can combine all sts onto one needle and continue knitting with two needles rather than three.)


Toe:
Repeat the next two rows until you have 65 sts:
Row 1: sl1, k1, kfb, k to the last 3 sts, kfb, k1, sl1
Row 2: sl1, k1, kfb, p to the last 3 sts, kfb, k1, sl1

Distribute the sts onto 4 dpns: 16, 16, 16, 17
K to the end of the 4th needle, sl the last st onto the first needle, and k that st tog with the first st on the first needle to join and start k in the round (total 64 sts: 16 each)
K 2 rounds


Toe decreases:

Round 1:
Needle 1: k to the last 3 sts, k2tog, k1
Needle 2: k1, ssk, k to end of needle
Needle 3: k to the last 3 sts, k2tog, k1
Needle 4: k1, ssk, k to end of needle

Round 2: k

Repeat these two rounds until you have 3 sts on each needle left (total 12 sts)
Bind off using Kitchener stitch.

(Note: I have not tested the revised pattern yet, but will hopefully do so soon. I kind of rewrote the pattern as I went along.)


Monday, May 19, 2008

Crocheted Market Tote

Since my last market tote was knit, and I was not completely satisfied with the end-result, I thought I would crochet one this time. I found this Crochet Grocery Bag on Ravelry and gave it a try.

I have never crocheted anything following instructions, so it was a bit of a challenge. Unlike knitting, though, it seems that when you crochet, it's a lot easier to muddle through on your own. At least for me. And I usually don't mind if things don't come out exactly the way the pattern says. I have another skein of Knit Picks Cotlin (this time the color is Desert Turquoise) I will use. And I have a tad left-over from the other market tote I could use for the handles, maybe, if I run out of yarn.

It starts out looking very much like a doily:


I don't know if I made any mistakes with the increases, or (you guessed it, I am not much of a gauge person) the yarn just ran differently from the original pattern, but in any case, this turned into a very small bag. It certainly looks much smaller than the picture that came with the pattern. Oh well...


I used up one skein of the turquoise, then used the little bit of blue I had left for the handles. I love the pattern, and the shape and everything, it's just way small. My daughter immediately snatched it. I definitely want to make another one and just make it bigger.

Sunday, May 11, 2008

Market Tote (again...)


Okay, so I made yet another tote bag attempt. This time, I followed the advice of "naturallyknitty" on Ravelry to knit in the round. She suggested Judy's Magic Cast-On, which I tried for the first time and totally fell in love with!!! I will use it on all my toe-up socks from now on. It's so much easier and tidier than what I have been doing.

Since one of the things I didn't like about my two prior attempts was the sloppy sides, knitting in the round with no seams on the sides or the bottom should take care of this problem. One of the things I read, though, about knitting this bag in the round, is to make sure the top opening is large enough.


By the way, I also changed needle size and am now knitting the tote with size US 7. I am using my beloved Knit Picks Harmony needles. Since I only had one skein of the lime green yarn, I had to switch to blue when I ran out of green. I tried to make a nice transition.


As you can see in the picture, the lime green is about 7 inches long, then I did a set of pattern (i.e., 4 rows) of blue, then another set of green, and back to blue for good. I had a little bit of green left. By the way, the Cotlin blue is called "Nightfall." At around 11 inches, I divided the stitches in half and worked the two sides separately, so the opening of the tote would be a little wider. I made the two sides about an inch or a bit more. Then cast them off.

And my next challenge started. What is an I-cord???? Or an applied I-cord? I had no idea. I read the instructions, played around a little, went online for more instructions, and more instructions, found this nifty little tutorial, and finally found this online tutorial for I-cord (scroll down). I later found another tutorial on YouTube, I think I would have liked better. I will try that next time.

I started the I-cord over several times and am still not quite happy with the end result. But I wanted to finish, so I let the sloppiness slide this time around. So, I used the applied I-cord along the two cast-offs and then the regular I-cord for the actual handles. Since I had a little bit of the lime green yarn left over, I used that for the applied I-cord, which probably added to the sloppy appearance, since the lime green stands out a little more. Oh well, you live and learn. I definitely want to make this bag again, and I will do better next time. So, here is the finished product:


I was also a bit messy in joining the ends of the handles with the beginning of the applied I-cords. I wanted to make sure I have a sturdy connection and in the process probably overdid it a little.

Overall, though, I like how the tote came out. Here is my husband sporting it:


He said the handles could have been a bit longer. I was afraid to make them too long, because I didn't know how much everything was going to stretch out once the tote is in use. I will have to see about that. If it doesn't "grow" too much, I might make the next tote a little bigger.

Another "FO" (finished object)! Yeah for me!!

Totally Unrelated to Knitting

Well, sort of...

I was looking at my friend Mary's Knitting on the Cam blog and found this:


What we have here is the top 106 books most often marked as "unread" by LibraryThing’s users. As in, they sit on the shelf to make you look smart or well-rounded. Bold the ones you've read, underline the ones you read for school, italicize the ones you started but didn't finish.

(I am not going to underline the ones I have read in school, I will just bold all the ones I have read. There should be another category for all the books I have on piles on my nightstand, that I want to read, but haven't gotten to yet.)

Jonathan Strange & Mr Norrell
Anna Karenina
Crime and Punishment
Catch-22
One Hundred Years of Solitude
Wuthering Heights
The Silmarillion
Life of Pi : a novel
The Name of the Rose
Don Quixote
Moby Dick
Ulysses
Madame Bovary
The Odyssey
Pride and Prejudice
Jane Eyre
The Tale of Two Cities
The Brothers Karamazov
Guns, Germs, and Steel: the fates of human societies
War and Peace
Vanity Fair
The Time Traveler’s Wife
The Iliad
Emma
The Blind Assassin
The Kite Runner
Mrs. Dalloway
Great Expectations
American Gods

A Heartbreaking Work of Staggering Genius
Atlas Shrugged
Reading Lolita in Tehran : a memoir in books
Memoirs of a Geisha
Middlesex
Quicksilver
Wicked : the life and times of the wicked witch of the West

The Canterbury Tales
The Historian : a novel
A Portrait of the Artist as a Young Man
Love in the Time of Cholera
Brave New World
The Fountainhead
Foucault’s Pendulum
Middlemarch
Frankenstein
The Count of Monte Cristo
Dracula
A Clockwork Orange
Anansi Boys
The Once and Future King
The Grapes of Wrath
The Poisonwood Bible : a novel
1984
Angels & Demons
The Inferno (and Purgatory and Paradise)
The Satanic Verses
Sense and Sensibility
The Picture of Dorian Gray
Mansfield Park
One Flew Over the Cuckoo’s Nest
To the Lighthouse
Tess of the D’Urbervilles
Gulliver’s Travels
Les Misérables
The Corrections
The Amazing Adventures of Kavalier and Clay
The Curious Incident of the Dog in the Night-Time
Dune
The Prince
The Sound and the Fury
Angela’s Ashes : a memoir
The God of Small Things
A People’s History of the United States : 1492-present
Cryptonomicon
Neverwhere
A Confederacy of Dunces
A Short History of Nearly Everything
Dubliners
The Unbearable Lightness of Being
Beloved
Slaughterhouse-five
The Scarlet Letter
Eats, Shoots & Leaves
The Mists of Avalon
Oryx and Crake : a novel
Collapse : how societies choose to fail or succeed
Cloud Atlas
The Confusion
Lolita
Persuasion
Northanger Abbey
The Catcher in the Rye
On the Road
The Hunchback of Notre Dame
Freakonomics : a rogue economist explores the hidden side of everything
Zen and the Art of Motorcycle Maintenance : an inquiry into values
The Aeneid
Watership Down
Gravity’s Rainbow
The Hobbit
In Cold Blood : a true account of a multiple murder and its consequences
White Teeth
Treasure Island
David Copperfield
The Three Musketeers


Wow, maybe I should knit less and read more...

Saturday, May 10, 2008

Too Many Unfinished WIPs (works in progress)?

And diagram for: Super Easy Poncho (scroll down)

Well, I opened the tote up yet again. I am just not happy with how it comes up. Maybe I should use slightly smaller needles to make it not look quite so sloppy? In any case, when I start them again, I will knit them in the round, I think. I have done a little research, and it appears, that is the most common modification people make when using this pattern. I will give it another try, but not today. So, technically, that's not an unfinished project any more. The yarn went back to my stash...

Because I was so frustrated with the tote, I started another pair of socks.

At least I know how to do socks by now. My old stand-by. But then my daughter counted all my WIPs for me, and I felt compelled to keep working on some of them. So, here is my progress...

I worked some more on the cabled shrug and finished it today. I wish I had used different yarn, as the Wool-Ease is a bit scratchy, but my dd says she likes the shrug anyway :). And here it is:


And another picture:


So, I finished one of my WIPs. Good for me.

And here is another project I have been working on for a long time. It's just a plain triangular wrap/shawl. I am very unmotivated about it, because I am tired of the yarn. I have made so many ponchos with Bernat Bling-Bling (see pictures below), that I just need a break from it. I bought a whole bunch of the that yarn in all kinds of different colors and made these ponchos. With the last color, I thought I would try something different and I am making this shawl. I will finish it eventually...


You can use any pattern you would like for the poncho. You can knit the two rectangles or crochet them. And you can decide on the size as well. My two pieces were roughly 70 x 40cm or 30x15", but of course that all depends on who you make the poncho for and how big you want it. You can add fringes or not. Since mine were knit kind of loose, I added a black ribbon to one of them around the neck, so the person wearing it can tie it a little tighter around the neck, rather than wearing it more off the shoulders. Your imagination is the limit...

Here are the parts and how you assemble them: