If you are a knitter and if you are online, you probably have heard about Socktoberfest by now. Being from Germany, from the land of the "Oktoberfest," I felt a strong urge to participate, or at least to knit some socks in October - does that count?
I already had some yarn sitting around (which knitter doesn't!), so it was easy to get a pair started. I picked the red and grayish black (Volcano Twist) Knit Picks Essential and cast on yet another pair of toe-up socks.
I used my new favorite magic cast-on again. I only cast on 8 (x2) stitches, and the result is a rather pointy toe. Not sure yet, how I will like that.
I had seen these really cute mini cable socks online and used those cables for my Socktober socks. I like the pattern. It's basically a four-stitch, four-rows pattern:
Row 1-3: k2, p2 Row 4: rt, p2
And here is the finished product. Another pair of socks for my (present, as in gift) stash (my husband says he is all decked out and does not need any more of my socks for the time being - even though red is his favorite color) from my (yarn) stash...
After my first market tote (with a limited amount of yarn) I had made from this inspiration...
...I decided to make a couple more, slightly larger. I had bought a large skein of Lily Sugar'n Cream Super Size Green and started my first tote with that yarn. I didn't really follow any particular pattern, but rather just kind of winged it.
I was pretty happy with the final product (this is my daughter modeling the tote):
And a few more pictures (sorry about the strange lighting, but this really is the same tote with the same yarn):
As you can see, this tote has a relatively large opening and two handles. Since there still was lots of yarn left, I decided to make another tote. This time with a tighter opening and only one handle:
The yarn is pretty sturdy and makes for strong totes. Should hold some heavy groceries. And since the yarn is 100% cotton, the totes can be tossed in the washing machine.
I am putting both totes in my secret stash for presents, I think.
It's been a while... I have taken a little knitting time-out. Or rather a blogging time-out. But here is another project I just finished:
My coworker is expecting her first baby, and I was trying to think of something to make for the special occasion. I decided on knitting a blanket. Since she is not much of a girly-girl, I tried to find colors that were appropriate for a baby blanket, yet not too cutesy. And I found some really great, bright colors!
The blanket is made of different squares. I came up with the color scheme and tried to either find patterns for designs or make them up myself. I tried to find things that were somewhat meaningful to the baby's parents. Here is my design:
“2008”
“flower”
“ladybug”
“horseshoe”
“star”
“ASL”
“1”
“2”
“3”
“paw”
“sun”
“4”
“5”
“6”
“ABC”
“guitar”
“7”
“8”
“9”
“heart”
“X”
“O”
“X”
“O”
“X”
The patterns for the individual squares are at the end of this post.
I bought some pretty cool looking bright colors and started knitting. I thought I would do the whole blanket all at once...
...but soon found myself all entangled with five different yarns and started over.
We spent three weeks with the in-laws over the summer, and I did a lot of knitting there. I knitted one column at a time. I had brought some graphing paper and had everybody in the family help with the different designs. Some came out better than others, but overall, I was pretty satisfied.
Once I had finished the five columns, I sewed them together. The columns made the piecing together a lot easier than having all the individual squares to sew together.
Individual patterns used for this blanket:
2008:
Cast on 36 sts.
Rows 1-6: knit across
K2, p32, k2.
P2, k32, p2.
K2, p3, k4, p25, k2.
P2, k25, p4, k3, p2.
K2, p2, k2, p2, k2, p24, k2.
P2, k24, p2, k2, p2, k2, p2.
K2, p3, k4, p25, k2.
P2, k25, p4, k3, p2.
K2, p2, k2, p2, k2, p24, k2.
P2, k24, p2, k2, p2, k2, p2.
K2, p3, k4, p25, k2.
P2, k25, p4, k3, p2.
K2, p9, k4, p19, k2.
P2, k19, p4, k9, p2.
K2, p8, k2, p2, k2, p18, k2.
P2, k18, p2, k2, p2, k8, p2.
K2, p7, k2, p4, k2, p17, k2.
P2, k17, p2, k4, p2, k7, p2.
K2, p8, k2, p2, k2, p18, k2.
P2, k18, p2, k2, p2, k8, p2.
K2, p9, k4, p19, k2.
P2, k19, p4, k9, p2.
K2, p17, k4, p11, k2.
P2, k11, p4, k17, p2.
K2, p16, k2, p2, k2, p10, k2.
P2, k10, p2, k2, p2, k16, p2.
K2, p15, k2, p4, k2, p9, k2.
P2, k7, p2, k4, p2, k15, p2.
K2, p16, k2, p2, k2, p10, k2.
P2, k10, p2, k2, p2, k16, p2.
K2, p17, k4, p11, k2.
P2, k11, p4, k17, p2.
K2, p22, k8, p2, k2.
P2, k2, p8, k22, p2.
K2, p27, k2, p3, k2.
P2, k3, p2, k27, p2.
K2, p25, k2, p5, k2.
P2, k5, p2, k25, p2.
K2, p23, k2, p7, k2.
P2, k2, p2, k3, p2, k23, p2.
K2, p24, k6, p2, k2.
P2, k4, p4, k24, p2.
K2, p32, k2.
P2, k32, p2.
Next 6 rows: k across.
Bind off 36.
Heart:
Ladybug:
ABC:
ASL: I Love You:
Horse shoe:
Star:
Sun:
Flower:
Guitar:
Numbers 1-9:
"1"
Cast on 36 stitches
Rows 1-4: knit across
Row 5: k3, p30, k3
Row 6: knit across
Rows 7 & 8: repeat rows 5 & 6
Row 9: k3, p10, k10, p10, k3
Row 10: knit across
Row 11-16: repeat rows 9 & 10
Row 17: k3, p13, k4, p13, k3
Row 18: knit across
Row 19-36: repeat rows 17 & 18
Row 37: k3, p10, k7, p13, k3
Row 38: knit across
Row 39-42: repeat rows 37 & 38
Row 43: k3, p12, k5, p13, k3
Row 44: knit across
Row 45: k3, p14, k3, p13, k3
Row 46: knit across
Row 47-50: repeat rows 5 & 6
Row 51-54: knit across
Bind off and weave in ends
In another color, I picked up all the stitches along one side of the square and knit 4-6 rows in seed stitch. Bind off.
Then I picked up all the stitches along the next side, knit 4-6 rows in seed stitch. Bind off.
I did this to all four sides for a nice border.
One of these days, I will come back and write up all the patterns for all the squares...
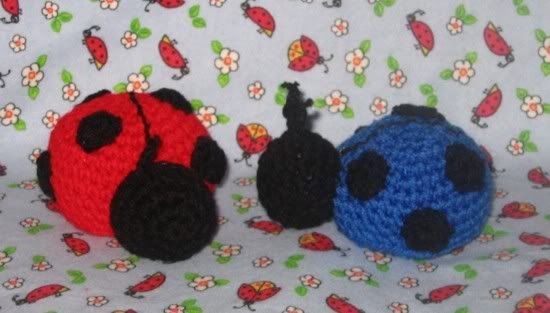
I am a big ladybug fan and wanted to share a few projects I found:
I made a baby blanket for a coworker with all kinds of dishcloth designs I either found or made up myself (I will post about that project later), and one of the squares is a ladybug I found on Designs by Emily:
At the end of each round, join with a slip stitch to beginning sc. With red, Chain 2, (starting at top of bug body) 1) 5 sc in 2nd chain from hook 2) ch 1, 2 sc in each sc around (10 sc) 3) ch 1, (2 sc in first sc, sc in next sc) repeat around (15 sc) 4) ch 1, (2 sc in first sc, sc in next 2 sc) repeat around (20 sc) 5-7) ch 1, sc in each sc around.. DO NOT FINISH OFF... Embroider spots now. With black yarn, embroider small X's on bug body. Resuming with red yarn,. 8) In BLO, ch 1, sc-dec around (10 sc) STUFF 9) ch 1, sc-dec around (5 sc) FO leaving long tail. Use tail to sew hole shut on bottom Weave in ends Head With black Chain 2 1) 5 sc in 2nd chain from hook 2) ch 1, 2 sc in each sc around (10 sc) 3) ch 1, sc in each sc around FO leaving long tail. Sew head to body. Antennas Cut a 2½ piece of black pipe cleaner. Push through head and bend up. Trim as desired Finish Glue on google eyes.
I also found this crochet pattern for a ladybug baby rattle (I have not made this yet, but just thought it was way cute!!!) on Crochetville:
Finished size: 2 1/4 inches tall, 4 inches long, and 3 inches wide Lady bug is worked in one continuous spiral, unless otherwise noted. Body With main color, and F hook, Ch 2 1) 6 sc in 2nd hook from chain 2) 2 sc in each ch around (12 sc) 3) (2 sc in first sc, sc in next sc) repeat around (18 sc) 4) (2 sc in first sc, sc in next 2 sc) repeat around (24 sc) 5) (2 sc in first sc, sc in next 3 sc) repeat around (30 sc) 6) (2 sc in first sc, sc in next 4 sc) repeat around (36 sc) 7-11) sc in each sc around Slp st to next sc, Ch 1. 12) In BLO (just for this round) (sc-dec, sc in next 4 sc) repeat around (30 sc) Now, back to working in a continuous spiral, 13) (sc-dec, sc in next 3 sc) repeat around (24 sc) Now add stuffing and cat ball inside body. Continue stuffing as you go. 14) (sc-dec, sc in next sc) repeat around (16 sc) 15) sc-dec around. (8 sc) FO leaving longer tail. Use tail to close hole, weave in end. Head With black, and F hook Ch 2 1) 6 sc in 2nd ch from hook 2) 2 sc in each sc around (12 sc) 3) (2 sc in first sc, sc in next sc) repeat around (18 sc) 4-6) sc in each sc around 7) (sc-dec, sc in next sc) repeat around (12 sc) Slp st to next sc and FO leaving long tail. Stuff and sew head to body. Spots (make 6) With black and f hook, Ch 2 1) 7 sc in 2nd ch from hook. Slp st to first sc, and FO Sew spots only ladybug. Antennas Figure out where you would like the antennas to be. Cut a piece of yarn about 12 inches long. Fold yarn in half. Using your hook, draw up the middle of the yarn piece, around the stitch where you want one of the antennas. Now, chain an additional 4 chains, using both yarn ends. You are now going to have a thicker chain for your antenna. Tie a few knots at the top of the antenna. Snip yarn ends close. Repeat on other side.
I will add patterns to this site as I find them. So please check back...
Cast on 28 sts with Magic Cast-on method Divide sts over 4 dpns (7 sts ea) Increase 4 sts every other round until you have a total of 68 sts Divide as follows: Two sole dpns: 19 sts ea, these will be knit The remaining 30 sts can either go onto one dpn or you can divide them onto two any way you like. Divide them as follows: p2, k8, p2, k8, p2, k8, p2. Every 8th round, the instep sts will be worked as follows: p2, slip2cnb, k2, k2cn, slip2cnf, k2cn, p2, k8, p2, slip2cnb, k2, k2cn, slip2cnf, k2cn, p2. Or, alternatively, you can have three cables, in which case you would do this: p2, slip2cnb, k2, k2cn, slip2cnf, k2cn, p2, slip2cnb, k2, k2cn, slip2cnf, k2cn, p2, slip2cnb, k2, k2cn, slip2cnf, k2cn, p2.
Work this until you get to where you increase for the heel (about your foot is about two - two and a half inches shorter than you want it to be). Now, every other round, m1 st at the beginning of the first sole dpn and at the end of the second sole dpn until you have 30 sts on each sole dpn, like so:
work dpn 1 and 2 (instep dpns) (or 1, if you decided to put the remaining sts all on one dpn) per above pattern work dpn 3 and 4 (sole dpns) (or dpns 2 and 3, if you have all the "pattern" sts on one dpn) as follows: dpn3: k1, m1, k rem sts dpn4: k to the last st, m1, k1 (Remember to increase (m1) only every other round!) Repeat this until you have 30 sts ea on dpns 3 and 4.
To turn the heel work dpns 3 and 4 as follows (the rest of the sts are resting during this): k33, ssk, k1, turn sl1, p7, p2tog, p1, turn sl1, k8, ssk, k1, turn sl1, p9, p2tog, p1, turn sl1, k10, ssk, k1, turn sl1, p11, p2tog, p1, turn Continue this way until all sts are worked and you have 34 sts left. Divide them up over 2 dpns again and continue working in the round again.
Combined with the 30 sts from the instep dpns, you now have 64 sts.
For the cuff, I decided to have cables all around. For this I needed 70 sts. I picked up 3 sts on each side of the heel (this has the added benefit, that you can avoid any holes you might have there).
Work the heel dpns with plain knit stitches until you have picked up the right number of sts, then start your pattern with the instep dpns, and then continue from there with the cable pattern: p2, k8, p2 until you get to row eight again, where you do a round of: *p2, slip2cnb, k2, k2cn, slip2cnf, k2cn, p2* as with the two cables, except that now you have seven cables around.
Work this pattern for as long as you want your cuff.
You can also add a ribbing, if you like. I chose not to do that with this pair of socks.
Bind off with your favorite loose bind off.
I used: 2nd to last round: m1 after every 2 sts. Last round: k *Ssk, put st back from rhn to lhn, rep from * until all sts are gone.
This makes for kind of a wavy bind-off. Use a different method, if you don't like this.